Kepler
Introduction to Kepler - basics
Kepler is a workflow engine and design platform for analyzing and modeling scientific data. Kepler provides a graphical interface and a library of pre-defined components to enable users to construct scientific workflows which can undertake a wide range of functionality. It is primarily designed to access, analyse, and visualise scientific data but can be used to construct whole programs or run pre-existing simulation codes.
Kepler builds upon the mature Ptolemy II framework, developed at the University of California, Berkeley. Kepler itself is developed and maintained by the cross-project Kepler collaboration.
The main components in a Kepler workflow are actors, which are used in a design (inherited from Ptolemy II) that separates workflow components (“actors”) from workflow orchestration (“directors”), making components more easily reusable. Workflows can work at very levels of granularity, from low-level workflows (that explicitly move data around or start and monitor remote jobs, for example) to high-level workflows that interlink complex steps/actors. Actors can be reused to construct more complex actors enabling complex functionality to be encapsulated in easy to use packages. A wide range of actors are available for use and reuse.
Installing Kepler and tutorial workflows
You can download Kepler from the following page https://kepler-project.org/users/downloads
In order to install Kepler and tutorial related workflows you have to follow the instruction at
Now you can start Kepler application and proceed to tutorial examples
Kepler IMAS actors
Imas actor |
Deacription |
|---|---|
UALSliceCollector |
Store one slice from input IDS into
different run. This way, it is possible
to collect intermediate results during
workflow execution.
|
UALPython |
Allows to run external Python process and
pass input/output data between workflow
and process itself. This actor is, most
commonly, used for data visualization.
User can pass Python script directly to
the actor.
|
UALMuxParam |
Provides similar behavior to
ualmux/UALMux, however, this actors has
two additional ports:
- fieldDescription - contains name of
the filed that will be modified
- fieldValue - contains new value of
the field
Main difference between ualmux/
ualmuxparam
actors lays in it’s ability to be used
in
a loop that modify different field
inside IDS.
You can simply provide different field
name
for different loop’s step.
|
UALMux |
Provides a method for putting data inside
IDS inputs
- inputIds/inputCpo - cpo we are going
to modify
- inTime - time index at which data are
supposed to be updated
- name of the field is specified as port
name
- new value of the field is passed as
value sent to the port
outputs:
- outputIds/outputCpo - modified IDS
- outTime - actual time index (depend
on approximation mode)
|
UALInit |
Initializes input pulse file, creates
run work and provides ID S description
for other actors
inputs:
- user - name of the user for input
data file (e.g. g2michal)
- machine - name of the machine for
input data file (e.g. test/jet)
- shot - shot number
- run - run number
- runwork - temporary run number
(place where output will be stored)
outputs:
- error - description of error in case
there are problems while accessing
input data
- all IDSess requested by user (each
IDS is specified as output port
name)
|
UALDemux |
Allows to read data from given IDS -
name of the field is specified as
output port.
|
UALCollector |
Stores input IDSess inside new run.
This way, it is possible to copy data
into different shot/run rather than
inside run work.
|
UALClose |
Closes run work based on description
passed via input IDS.
|
SetBreakpoint |
This actor allows to enforce “debug”
mode for IMAS based actors. It sets
global parameter “ITM_DEBUG” to either
true or false. In case true is a value
of “ITM_DEBUG” all FC2K generated actors
will start in debug mode.
|
RecordSet |
Sets values inside record (take a look
for short tutorial: RecordGet/RecordSet)
|
RecordGet |
Gets values from the record (take a
look here for short tutorial:
RecordGet/RecordSet)
|
IDSOccurence |
Provides a method to create duplicate
of IDS with new occurrence number.
This way, it is possible to store data
before they get modified by user code.
|
IDSFlush |
Flushes data from workflow. Data from
memory cache are stored inside database
|
IDSDiscard |
Discards data inside workflow. Data will
be re-read into memory cache.
|
IDSContentStd |
Displays IDS data on console (better
for huge data sets)
|
IDSContent |
Displays IDS data
|
IMAS Kepler based configuration
Running Kepler using IMAS environment
Setting up environment
Please do not forget to set JAVA memory settings:
export _JAVA_OPTIONS="-Xss20m -Xms8g -Xmx8g"
Backing up old files
Before first configuration of Kepler, make sure to backup your old data files
cd ~
mv .kepler .kepler~
mv KeplerData KeplerData~
mv .ptolemyII .ptolemyII~
Creating place to store your personal installations of Kepler
IMAS based installations are stored inside $HOME/kepler directory.
Before proceeding further, make sure to create kepler directory
# create directory inside $HOME
cd ~
mkdir kepler
Running Kepler (default release)
- In order to start Kepler you have use helper scripts that will install and configure your personal copy of Kepler
load IMAS module
module load imas
module load kepler
# NOTE! It might be that you don't have Kepler copy inside your $HOME
# in that case you need to install it kepler_install_light
Start Kepler
# run alias that will execute Kepler
kepler
FC2K - Embedding user codes into Kepler
This tutorial is designed to introduce the concept of using FC2K tool in order to build Kepler compatible actors.
This tutorial explains
how to set up codes for FC2K
how to build actor using FC2K
how to incorporate actor within Kepler workflow
FC2K basics
What FC2K actually does?
Generates a Fortran/CPP wrapper, which intermediates between Kepler actor and user code in terms of:
reading/writing of in/out physical data (IDS)
passing arguments of standard types to/from the actor
Creates a Kepler actor that:
calls a user code
provides error handling
calls debugger (if run in “debug” mode)
calls batch submission commands for MPI based actors
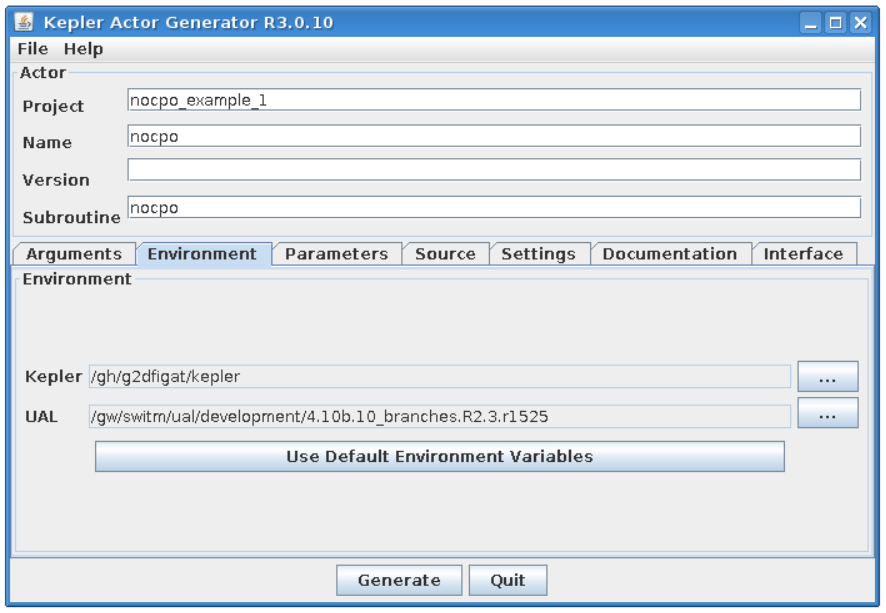
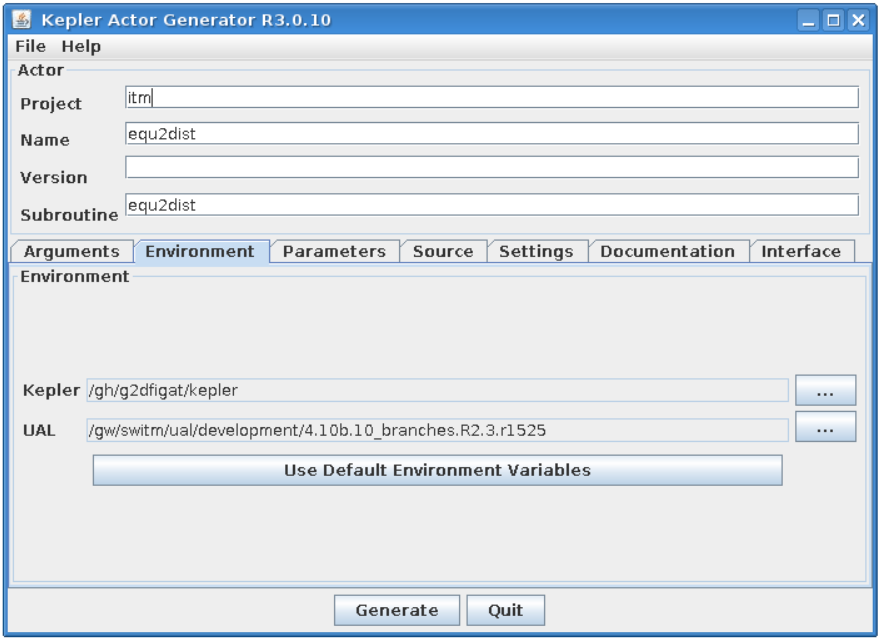
FC2K main window
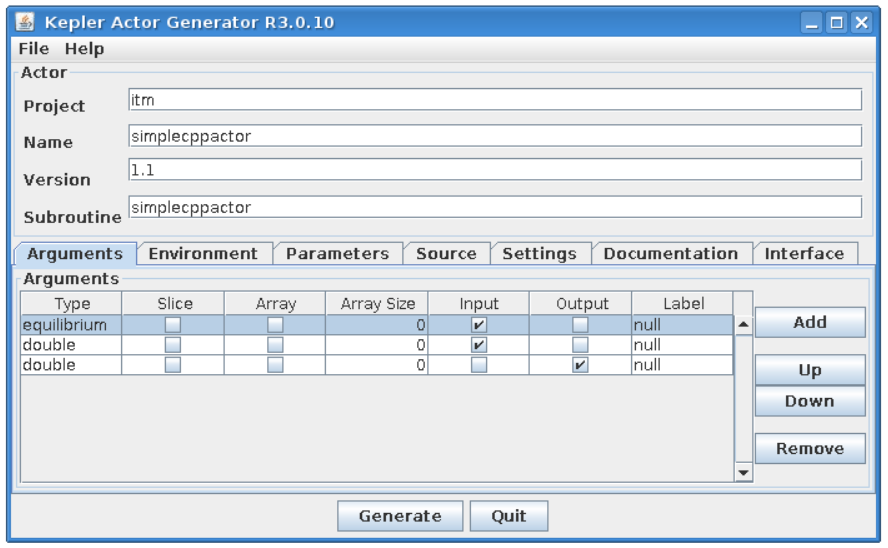
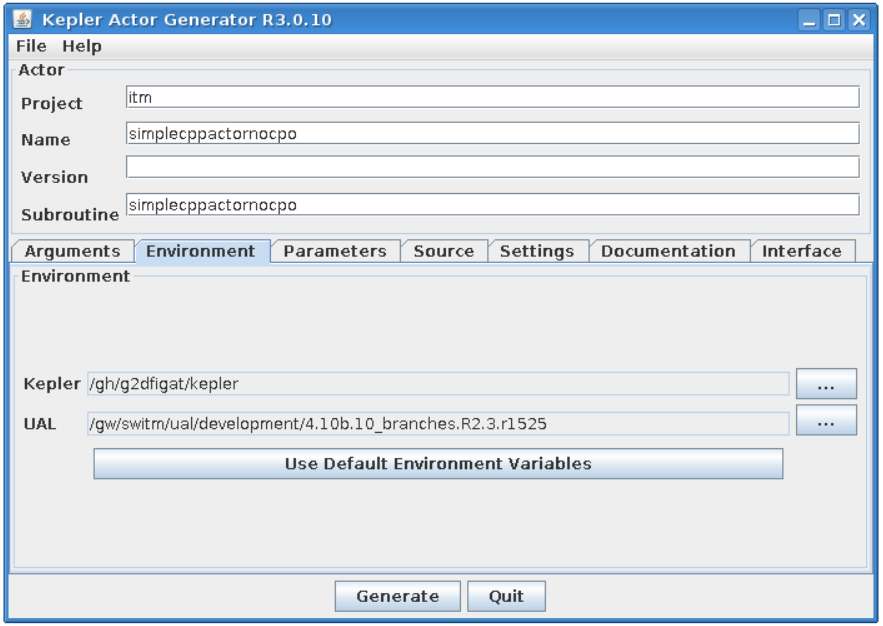
Actor description

This group of graphical controls allows to set the description of the actor and its “place” in hierarchy of Kepler elements in Kepler “Component” browser
Project - defines a branch in Kepler “Component” browser where an actor will be placed
Name - a user defined name of the actor
Version - a user defined version of user codes
Subroutine - A name of user subroutine (Fortran) or function (C++)
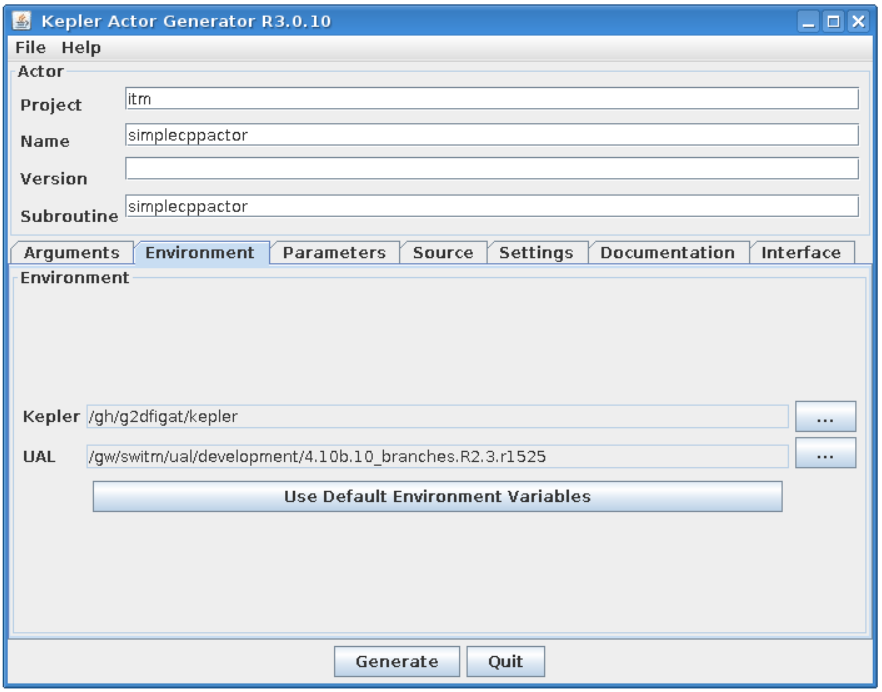
Environment
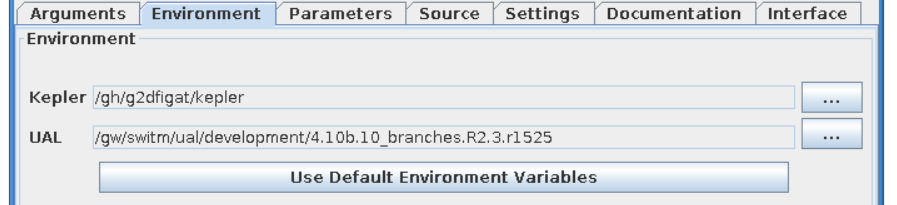
The Environment text fields shows UAL and Kepler locations.
Kepler - Kepler location (usually the same as $KEPLER)
UAL - IMAS UAL location (usually the same as $IMAS_PREFIX)
“Arguments” tab explained
Below you can find explanation of FC2K arguments tab.
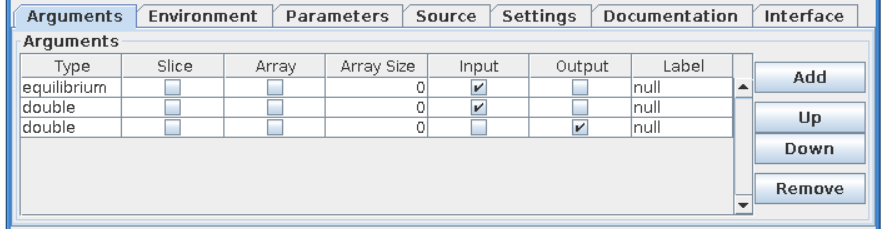
Type - Defines a type of an argument. It is possible to choose either IDS based type (e.g. equilibrium, topinfo, etc.) or primitive type (e.g. int, long, double, char)
Single slice - Determines if IDS is passed as single slice or an array. (This setting is valid for IDS types only )
if turned ON - Only one slice is passed. An actor will get an additional port to define a time.
if turned OFF - All IDSes for given shot run is passed.
Is array - Determines if a primitive type is passed as a scalar or an array
if turned ON - An argument is passed as an array. It requires definition of array size (dynamic array are not supported)
if turned OFF - An argument is passed as a scalar.
Array size - Defines the size of an array of primitive types
Input - Defines argument as an input
Output - Defines argument as an output
Label - User defined name of an argument (and actor port)
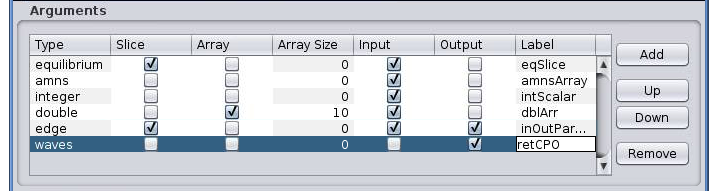
Please take a look on a screenshot above:
equilibrium - an input parameter - one IDS (slice)
amns - an input parameter - all amns IDS slices stored in given shot/run
integer - an input parameter - a scalar
double - an input parameter - an array of size 10
edge - an in/out parameter - single slice of “edge” IDS
waves - an output parameter - all slices of “waves” IDS
“Parameters” tab explained
Code specific parameters are all parameters which are specific to the code (like switches, scaling parameters, and parameters for built-in analytical models) as well as parameters to explicitly overrule fields in the ITM data structures.
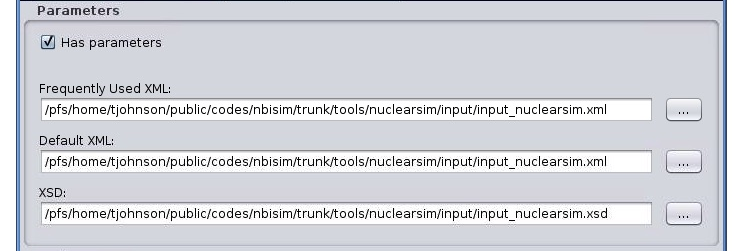
Frequently Used XML - Actual value of the code parameters
Default XML - Default values of the code parameters
Schema - A (XSD) XML schema
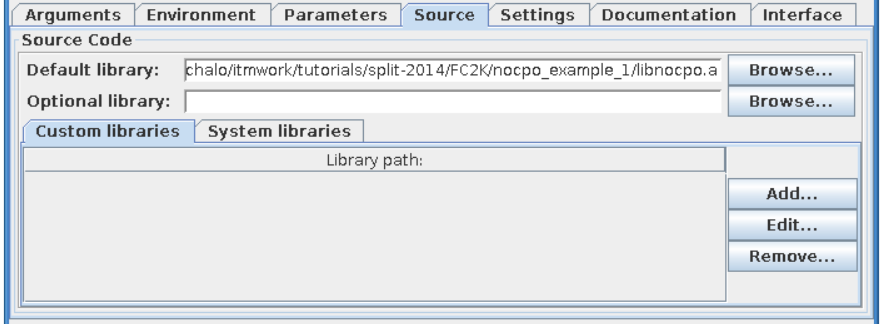
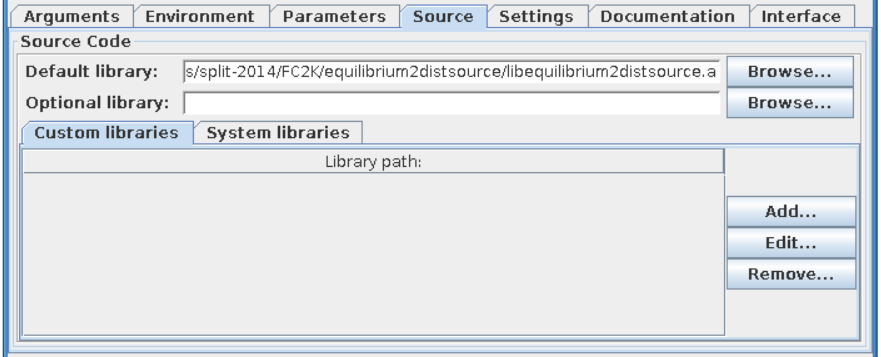
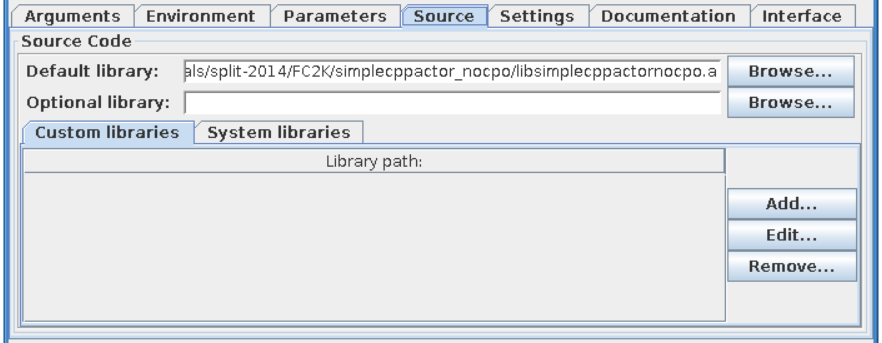
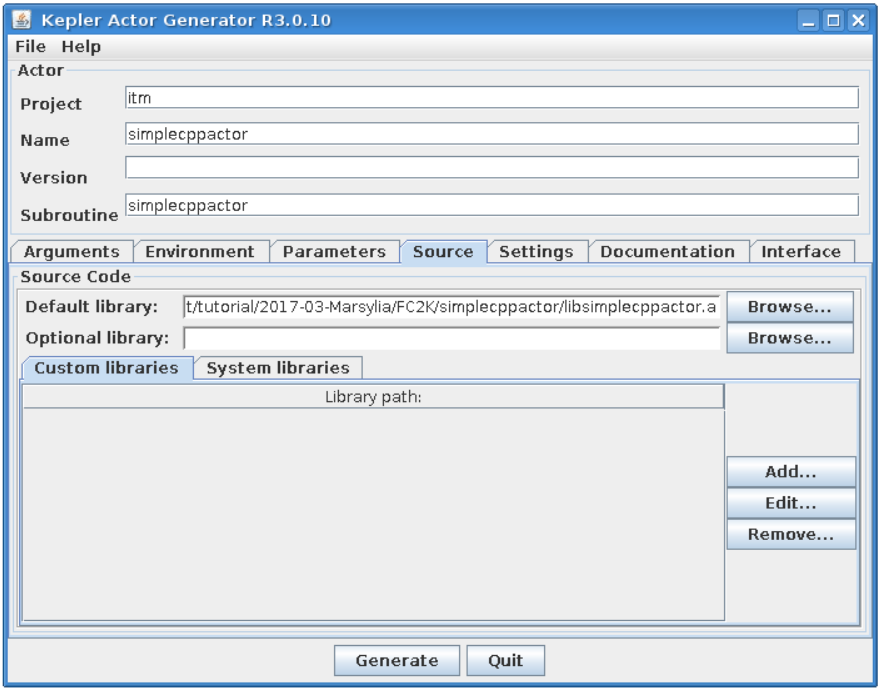
“Source” tab explained
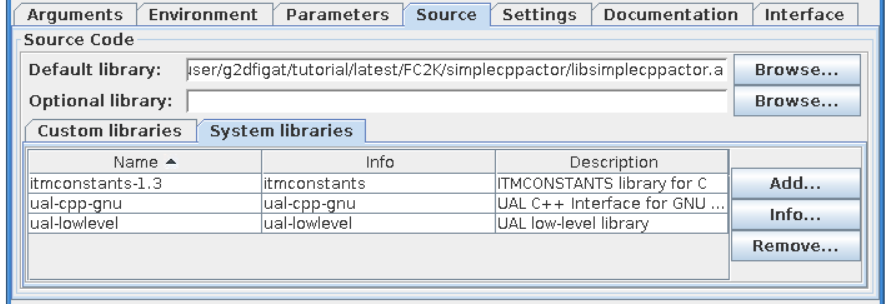
The purpose of this tab is to define all code related issues:
a programming language
utilized compiler,
type of code execution (sequential of parallel)
libraries being used
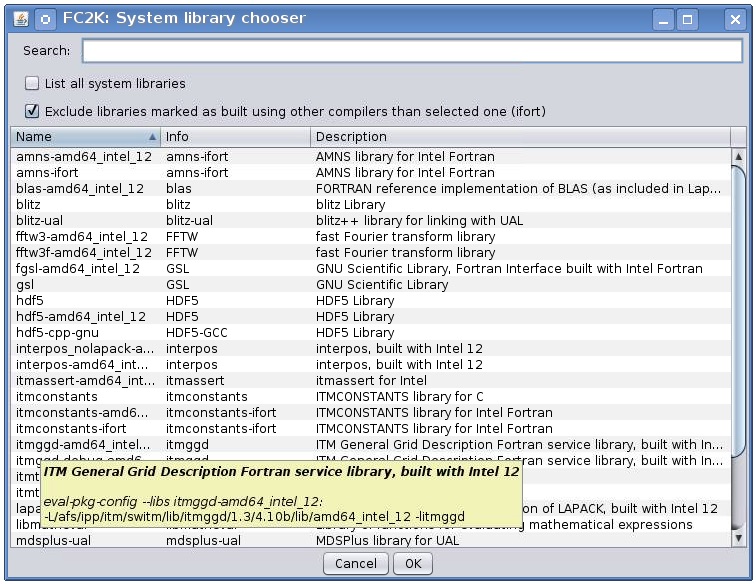
Libraries
“Main library”
A “Main library” field allows to define a path to library containing user subroutine/function.

“Optional library”
A “Optional library” field allows to define a path to optional library containing user subroutine/function.
“Custom libraries”
“Custom libraries” are non-standard static libraries required for building the user code.
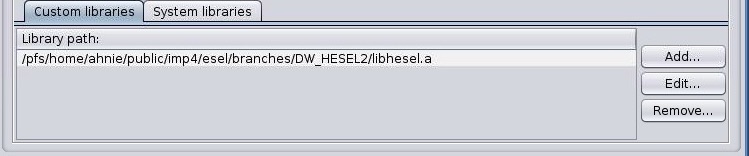
Available operations on libraries list:
“Add…” - Adds a new library to the list
“Edit…” - Edits library path
“Remove” - Removes a new library from the list
“System libraries”
“System libraries” are system libraries handled by pkg-config mechanism and required for building the user code.
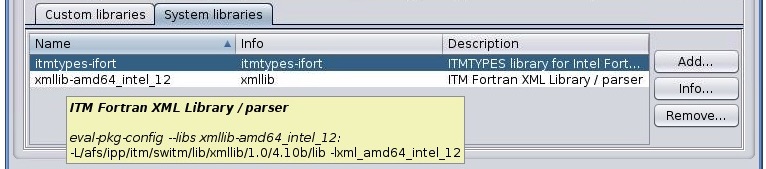
A user can:
add library from the list,
remove library
display detailed info (library definition returned by pkg-config mechanism)
“Settings” tab explained
A user, using this tab, selects programming language of codes provided, compiler used to built library and type of code execution (sequential or parallel)
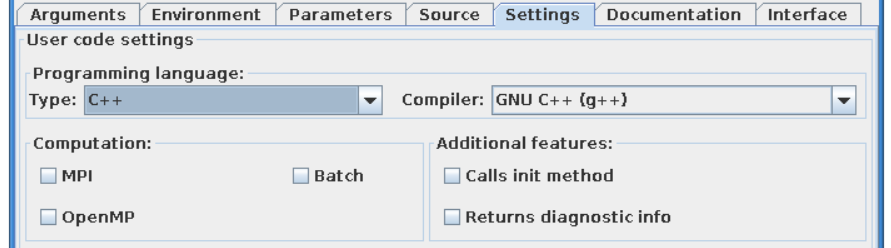
Programming languange:
Type - Defines programming language of user codes. It could be set to:
Fortran
_C/C++
Compiler - Defines compiler being used. Possible values:
ifort, gfortran
gcc, g++
Computation:
Parallel MPI - If turned ON uses MPI compilers (mpiifort for ifort, mpif90 for gfortran, mpigxx for C)
OPENMP - Defined if usage of OpenMP directives is turned ON/OFF
Batch - If turned ON, submits a user code to jobs queue (combined with Parallel MPI or OPENMP switch runs user code as parallel job)
Additional features:
Calls init method - If user function needs any pre-initialization, an additional function will be called.
Returns diagnostic info - adds output diagnostic information
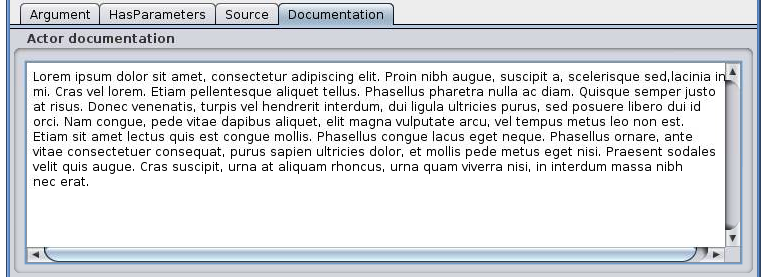
“Documentation” tab explained
The “Documentation” tab specifies an user-defined Kepler actor description. It could be displayed from actor pop-up menu.
Incorporating user codes into Kepler using FC2K - exercises
In this part of the tutorial you will learn how to incorporate Fortran and C++ codes into Kepler.
Hands-on exercises show:
how to prepare C++ codes for FC2K
how to prepare C++ library
how set up Makefile
how start and configure FC2K tool
Embedding Fortran codes into Kepler
Simple Fortran code
In this exercise you will execute simple Fortran code (multiplying input value by two) within Kepler.
Fortran UAL example (CPO handling)
In this exercise you will create Kepler actor that uses UAL.
FC2K - developer guidelines
What code wrapper actually does?
The code wrapper intermediates between Kepler actor and user code:
Passes variables of language built-in types (int, char, etc) from actor to the code
Reads CPO(s) from UAL and passes data to user code
Passes input code parameters (XML/XSD files) to user code
Calls user subroutine/function
Saves output CPO(s)
Development of Fortran codes
Subroutine syntax
subroutine name (<in/out arguments list> [,code_parameters] [,diagnostic_info])
name - subroutine name
in/out arguments list - a list of input and output subroutine arguments
diagnostic_info - arbitrary output diagnostic information
Arguments list
A mandatory position
A list of input and output subroutine arguments including:
Fortran intrisic data types, eg:
integer :: input
character(50) :: charstring
integer,dimension(4) :: tabint
CPOs, eg:
type (type_equilibrium),pointer :: equilibriumin(:)
type (type_distsource),pointer :: distsourceout(:)
Code parameters
user defined input parameters
input / optional
Argument of type: type_param
type type_param  !
    character(len=132), dimension(:), pointer ::parameters
    character(len=132), dimension(:), pointer ::default_param
    character(len=132), dimension(:), pointer ::schema
endtype
Derived type type_param describes:
parameters - Actual value of the code parameters (instance of coparam/parameters in XML format).
default_param - Default value of the code parameters (instance of coparam/parameters in XML format).
schema - Code parameters schema.
An example:
(type_param) :: codeparam{{
Diagnostic info
arbitrary output diagnostic information
output / optional
!----  Diagnostic info  ----
integer, intent(out)     ::     user_out_outputFlag
character(len=:), pointer, intent(out)    ::    user_out_diagnosticInfo
outputFlag - indicates if user subroutine was successfully executed
outpuflag = 0 - SUCCESS, no action is taken
outputFlag > 0 - WARNING, a warning message is displayed, workflow continuue execution
outputFlag < 0 - ERROR, actor throws an exception, workflow stops
diagnosticInfo - an arbitrary string
Examples
**Example 1 Simple in/out argument types**
subroutine nocpo(input, output)
   integer, intent(in):: input
   integer, intent(out):: output
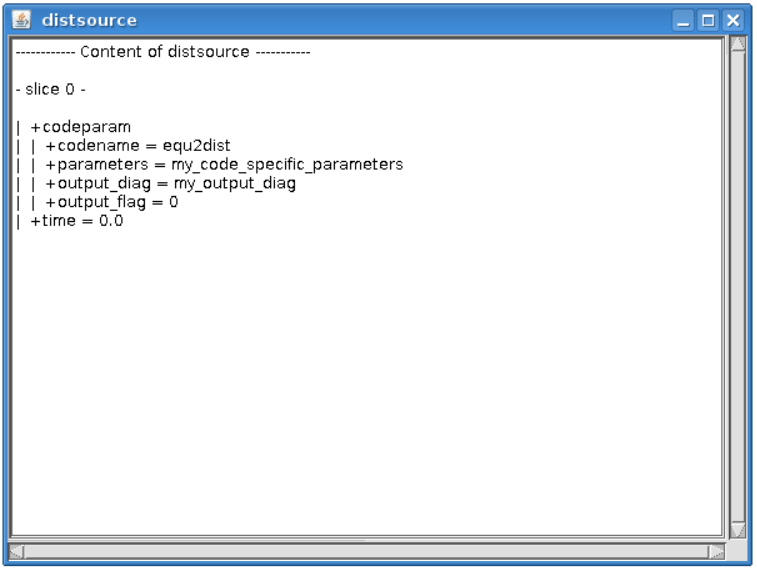
**Example 2 A CPO array as a subroutine argument**
subroutine equil2dist(equilibriumin, distsourceout)
    use euITM_schemas
    implicit none

    !input
    type (type_equilibrium), pointer :: equilibriumin(:)
    !output
    type (type_distsource), pointer :: distsourceout(:)
**Example 3 Usage of code input parameters**
subroutine teststring(coreprof,equi,tabint,tabchar,codeparam)
    use euITM_schemas

    implicit none

!input
    type(type_coreprof),pointer,dimension(:) :: coreprof
    integer, dimension(4), intent(in) :: tabint

!output
    type(type_equilibrium),pointer,dimension(:) :: equi
    character(50), intent(out) :: tabchar

!code parameters
    type(type_param), intent(in) :: codeparam
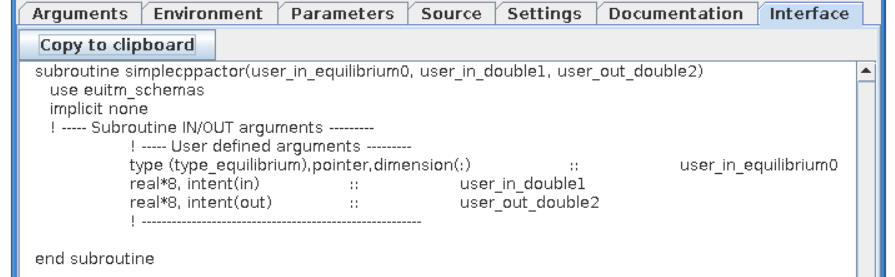
Development of C++ codes
Function syntax
void name ( <in/out arguments list> [,code_parameters] [,diagnostic_info] )
name - function name
code_parameters - optional - user defined input parameters
diagnostic_info - arbitrary output diagnostic information
Arguments list
in/out arguments list
mandatory
a list of input and output function arguments including:
CPP intrisic data types, eg:
int &x
double &y
CPOs, eg:
ItmNs::Itm::antennas & ant
ItmNs::Itm::equilibriumArray & eq
Code parameters
Optional
User defined input parameters
Argument of type: ItmNs:: codeparam_t &
typedef struct {
   char **parameters;
   char **default_param;
   char **schema;
} codeparam_t;
A structure codeparam_t describes:
parameters - Actual value of the code parameters (instance of coparam/parameters in XML format).
default_param - Default value of the code parameters (instance of coparam/parameters in XML format).
schema - Code parameters schema.
An example: ItmNs::codeparam_t & codeparam
Diagnostic info
arbitrary output diagnostic information
output / optional
void name(...., int* output_flag, char** diagnostic_info)
output_flag - indicates if user subroutine was successfully executed
output_flag = 0 - SUCCESS, no action is taken
output_flag > 0 - WARNING, a warning message is displayed, workflow continuue execution
output_flag < 0 - ERROR, actor throws an exception, workflow stops
diagnostic_info - an arbitrary string
Examples
**Example 4. Simple in/out argument types**
void simplecppactornocpo(double &x, double &y)
**Example 5. A CPO array as a function argument**
void simplecppactor(ItmNs::Itm::equilibriumArray &eq, double &x, double &y)
**Example 6. Usage of init function and code input parameters**
void mycppfunctionbis_init();
void mycppfunction(ItmNs::Itm::summary& sum, ItmNs::Itm::equilibriumArray& eq, int& x, ItmNs::Itm::coreimpur& cor,  double&  y, ItmNs::codeparam_t& codeparam)
Delivery of the user code
The user code should be delivered as a static library. Please find examples of the simple “makefiles” below:
**Example 6. Building of Fortran code**
F90 = $(ITM_INTEL_FC)
COPTS = -g -O0 -assume no2underscore -fPIC -shared-intel

INCLUDES = $(shell eval-pkg-config --cflags ual-$(ITM_INTEL_OBJECTCODE))

all: equilibrium2distsource.o libequilibrium2distsource

libequilibrium2distsource: equilibrium2distsource.o
       ar -rvs libequilibrium2distsource.a equilibrium2distsource.o

equilibrium2distsource.o: equilibrium2distsource.f90
       $(F90) $(COPTS) -c -o $@ $^ ${INCLUDES}

clean:
      rm -f *.o *.a
**Example 7. Building of C++ code**
CXX=g++
CXXFLAGS= -g -fPIC
CXXINCLUDES= ${shell eval-pkg-config --cflags ual-cpp-gnu}

all: libsimplecppactor.a

libsimplecppactor.a: simplecppactor.o
     ar -rvs $@ $^

simplecppactor.o: simplecppactor.cpp
     $(CXX) $(CXXFLAGS) $(CXXINCLUDES) -c -o $@ $^

clean:
     rm *.a *.o
FC2K - Example 1 - Embedding Fortran codes into Kepler (no CPOs)
The knowledge gained After this exercise you will:
know how to prepare Fortran codes for FC2K
know how to build Fortran library
know how set up Makefile
know how start and configure FC2K tool
In this exercise you will execute simple Fortran code within Kepler. In order to this follow the instructions:
Get familiar with codes that will be incorporated into Kepler
Go to Code Camp related materials within your home directory
shell> cd $TUTORIAL_DIR/FC2K/nocpo_example_1
You can find there various files. Pay particular attention to following ones:
nocpo.f90 - Fortran source code that will be executed from Kepler
Makefile - makefile that allows to build library file
nocpo_fc2k.xml - parameters for FC2K application (NOTE! this file contains my own settings, we will modify them during tutorial)
nocpo.xml - example workflow
Prepare environment for FC2K
Make sure that all required system settings are correctly set
shell> source $ITMSCRIPTDIR/ITMv1 kepler test 4.10b > /dev/null
Start FC2K application
This is as simple as typing fc2k from terminal
shell> fc2k
After a while, you should see FC2K’s main window.
Open a nocpo_example_1 project
Choose File -> Open and navigate to $TUTORIAL_DIR/FC2K/nocpo_example_1.
Open file nocpo_fc2k.xml.
You should see new parameter settings loaded into FC2K.
After loading parameters you can notice that parameters point to locations within your home directory.
Project settings
Please take a look at the project settings.

Subroutine arguments:
one input argument of type integer
one output argument of type integer
After all the settings are correct, you can generate actor
Simply press “Generate” button and wait till FC2K finishes the generation.
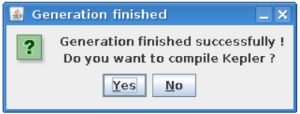
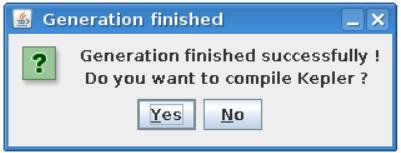
Confirm Kepler compilation
After actor is generated, FC2K offers to compile Kepler application. Make sure to compile it by pressing “Yes”.

You can now start Kepler and use generated actor
Open new terminal window and make sure that all environment settings are correctly set and execute Kepler.
shell> source $ITMSCRIPTDIR/ITMv1 kepler test 4.10b > /dev/null
shell> kepler.sh
After Kepler is started, open example workflow from the following location
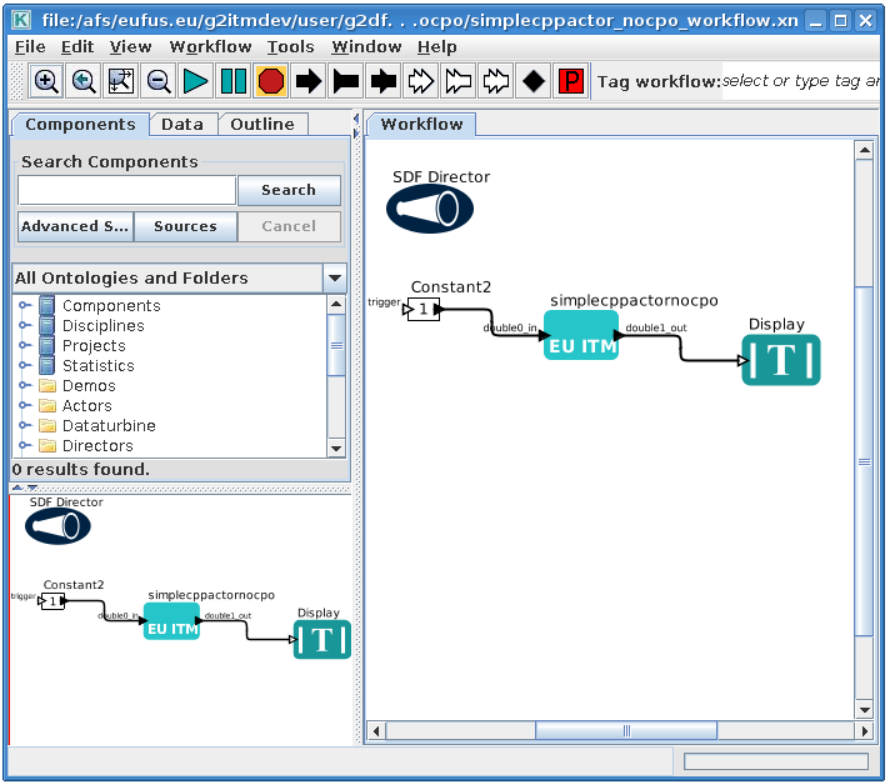
$TUTORIAL_DIR/FC2K/nocpo_example_1/nocpo.xml
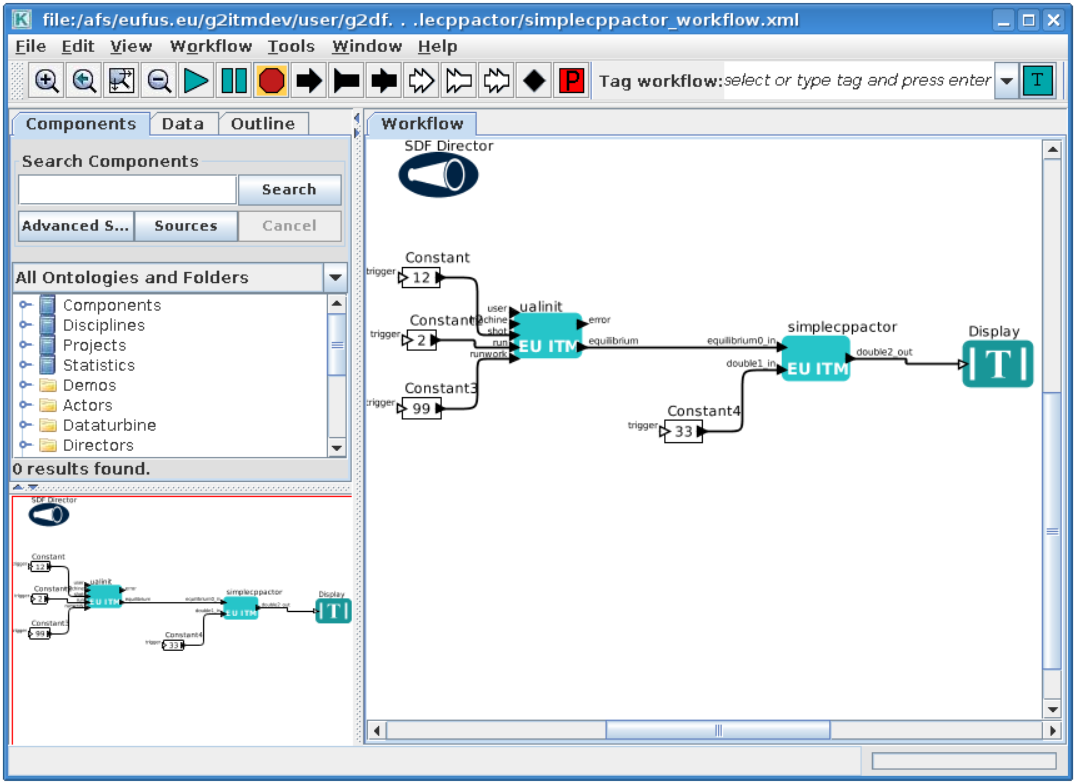
You should see similar workflow on screen.
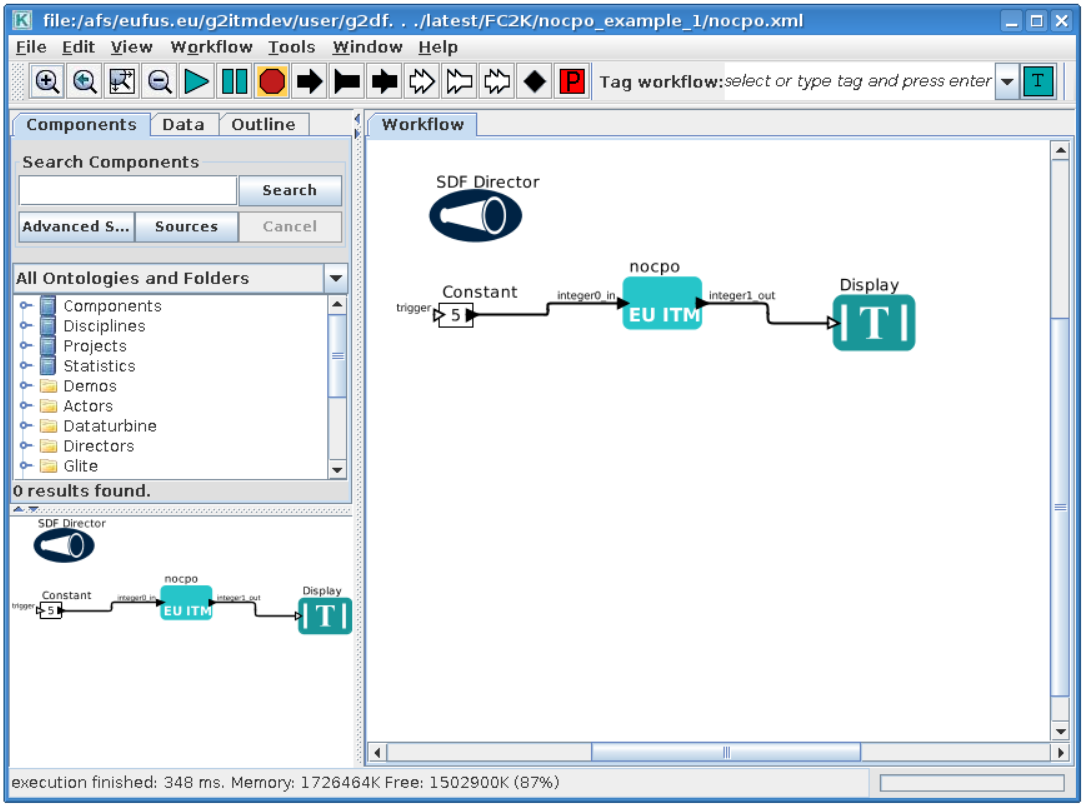
Launch the workflow
You can start the workflow execution, by pressing “Play” button

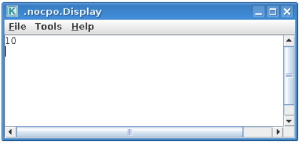
After workflow finishes it’s execution, you should see result similar to one below:
Exercise no. 1 finishes here.
FC2K - Example 2 - Embedding Fortran code into Kepler (CPOs)
Exercise no. 2.
Fortran example (CPO handling)
(approx. 30 min)
The knowledge gained
After this exercise you will:
know how to prepare Fortran codes that use UAL
know how to prepare Fortran based library that uses UAL
know how set up Makefile
know how start and configure FC2K tool
In this exercise you will execute simple Fortran code that uses UAL. Code will be incorporated into Kepler. In order to do this follow the instructions:
Get familiar with codes that will be incorporated into Kepler
Go to Code Camp related materials within your home directory
shell> cd $TUTORIAL_DIR/FC2K/equilibrium2distsource/
You can find there various files. Pay particular attention to following ones:
equilibrium2distsource.f90 - Fortran source code that will be executed fromKepler - this code uses UAL
Makefile - makefile that allows to build library file
cposlice2cposlicef_fc2k.xml - parameters for FC2K application (NOTE! this file contains my own settings, we will modify them during tutorial)
cposlice2cposlicef_kepler.xml - example workflow
Build the code
A Fortran example could be built by issuing
shell> make clean -f make_ifort
shell> make -f make_ifort
Codes are ready to be used within FC2K
Prepare environment for FC2K
Make sure that all required system settings are correctly set
shell> source $ITMSCRIPTDIR/ITMv1 kepler test 4.10b > /dev/null
Start FC2K application
This is as simple as typing fc2k from terminal
shell> fc2k
After a while, you should see FC2K’s main window
Open project cposlice2cposlicef_fc2k
Choose File -> Open
Navigate to $TUTORIAL_DIR/FC2K/equilibrium2distsource/.
Open file cposlice2cposlicef_fc2k.xml.
You should see new project loaded into FC2K.
Project settings
Please take a look at the project settings.

Subroutine arguments:
one input argument - CPO array
one output argument - CPO array
After loading parameters you can notice that library location points to location within your itmwork directory ($ITMWORK).
After all the settings are correct, you can generate actor
Simply press “Generate” button and wait till FC2K finishes the generation.
Confirm Kepler compilation
After actor is generated, FC2K offers to compile Kepler application. Make sure to compile it by pressing “Yes”.
You can now start Kepler and use generated actor
Open new terminal window and make sure that all environment settings are correctly set and execute Kepler.
shell> source $ITMSCRIPTDIR/ITMv1 kepler test 4.10b > /dev/null
shell> kepler.sh
After Kepler is started, open example workflow from the following location
shell> $TUTORIAL_DIR/FC2K/equilibrium2distsource/cposlice2cposlicef_kepler.xml
You should see similar workflow on screen.

Launch the workflow
You can start the workflow execution, by pressing “Play” button

After workflow finishes it’s execution, you should see result similar to one below:
Exercise no. 2 finishes here.
FC2K - Example 3 - Embedding C++ code within Kepler (no CPOs)
Exercise no. 3
Embedding simple C++ code within Kepler (no CPOs)
(approx. 30 min)
The knowledge gained After this exercise you will:
know how to prepare C++ codes for FC2K
know how to prepare C++ library
know how set up Makefile
know how start and configure FC2K tool
In this exercise you will execute simple C++ code within Kepler. In order to do this follow the instructions:
Get familiar with codes that will be incorporated into Kepler
Go to Code Camp related materials within your home directory
cd $TUTORIAL_DIR/FC2K/simplecppactor_nocpo
You can find there various files. Pay particular attention to following ones:
simplecppactornocpo.cpp - C++ source code that will be executed from Kepler
Makefile - makefile that allows to build library file
simplecppactor_nocpo_fc2k.xml - parameters for FC2K application (NOTE! this file contains my own settings, we will modify them during tutorial)
simplecppactor_nocpo_workflow.xml - example workflow
Prepare environment for FC2K
Make sure that all required system settings are correctly set
shell> source $ITMSCRIPTDIR/ITMv1 kepler test 4.10b > /dev/null
Start FC2K application
This is as simple as typing fc2k from terminal
shell> fc2k
After a while, you should see FC2K’s main window
Open project simplecppactor_nocpo
Choose File -> Open
Navigate to $TUTORIAL_DIR/FC2K/simplecppactor_nocpo
Open file simplecppactor_nocpo_fc2k.xml.
You should see new project loaded into FC2K.
Project settings
Please take a look at the project settings.

Function arguments:
one input argument - double
one output argument - double
After loading parameters you can notice that library location points to location within your $TUTORIAL_DIR directory.
Actor generation
After all the settings are correct, you can generate actor
Simply press “Generate” button and wait till FC2K finishes the generation.
Confirm Kepler compilation
After actor is generated, FC2K offers to compile Kepler application. Make sure to compile it by pressing “Yes”.
You can now start Kepler and use generated actor
Open new terminal window and make sure that all environment settings are correctly set and execute Kepler.
shell> source $ITMSCRIPTDIR/ITMv1 kepler test 4.10b > /dev/null
shell> kepler
After Kepler is started, open example workflow from the following location
$TUTORIAL_DIR/FC2K/simplecppactor_nocpo/simplecppactor_nocpo_workflow.xml
You should see similar workflow on screen.
Launch the workflow
You can start the workflow, by pressing “Play” button

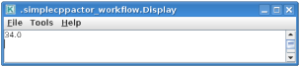
After workflow finishes it’s execution, you should see result similar to one below:
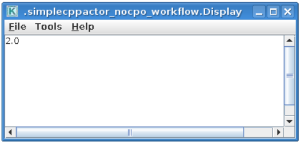
Exercise no. 3 finishes here.
FC2K - Example 4 - Embedding C++ code within Kepler (CPOs)
Exercise no. 4
C++ code within Kepler (CPO handling)
(approx. 30 min)
The knowledge gained: After this exercise you will: - know how to prepare C++ codes for FC2K - know how to prepare C++ library - know how set up Makefile - know how start and configure FC2K tool In this exercise you will execute simple C++ code within Kepler. In order to do this follow the instructions:
Get familiar with codes that will be incorporated into Kepler
Go to Code Camp related materials within your home directory
shell> cd $TUTORIAL_DIR/FC2K/simplecppactor
You can find there various files. Pay particular attention to following ones:
simplecppactor.cpp - C++ source code that will be executed from Kepler
Makefile - makefile that allows to build library file
simplecppactor_fc2k.xml - parameters for FC2K application (NOTE! this file contains my own settings, we will modify them during tutorial)
simplecppactor_workflow.xml - example workflow
Prepare environment for FC2K
Make sure that all required system settings are correctly set
shell> source $ITMSCRIPTDIR/ITMv1 kepler test 4.10b > /dev/null
Start FC2K application
This is as simple as typing fc2k from terminal
shell> fc2k
After a while, you should see FC2K’s main window.
Open project simplecppactor
Choose File -> Open
Navigate to $TUTORIAL_DIR/FC2K/simplecppactor.
Open file simplecppactor_fc2k.xml.
You should see new parameter settings loaded into FC2K.
Project settings
Please take a look at the project settings.

Function arguments:
input argument - equilibrium
input argument - double
output argument - double
You should modify these setting, so they point to locations within you home directory. They will typically be as follows:
Actor generation
After all the settings are correct, you can generate actor Simply press “Generate” button and wait till FC2K finishes the generation.
Confirm Kepler compilation
After actor is generated, FC2K offers to compile Kepler application. Make sure to compile it by pressing “Yes”.

You can now start Kepler and use generated actor
Open new terminal window and make sure that all environment settings are correctly set and execute Kepler.
shell> source $ITMSCRIPTDIR/ITMv1 kepler test 4.10b > /dev/null
kepler.sh
After Kepler is started, open example workflow from the following location
shell> $TUTORIAL_DIR/FC2K/simplecppactor/simplecppactor_workflow.xml
You should see similar workflow on screen.
Launch the workflow
You can start the workflow, by pressing “Play” button

After workflow finishes it’s execution, you should see result similar to one below:
Exercise no. 4 finishes here.
IMAS Kepler 2.1.3 (default release)
Installation of default version of Kepler (without actors)
In order to use most recent version of Kepler do following. First of all make sure you have directory imas-kepler inside your $HOME
 in case you already have imas-kepler inside $HOME
 you can move it to $ITMWORK/imas-kepler
> mv $HOME/imas-kepler $ITMWORK/imas-kepler

 If you don't have $HOME/imas-kepler directory, create
 it inside $ITMWORK
> mkdir $ITMWORK/imas-kepler

 create symbolic link inside $HOME
> cd $HOME
> ln -s $ITMWORK/imas-kepler
Then, you can load imasenv module by calling
> module load imasenv
If there is no Kepler version installed, you will be informed by message
WARNING: Cannot find /afs/eufus.eu/user/..../imas-kepler/2.5p2-2.1.3... Run kepler_install_light before running kepler;
INFO: setting KEPLER=/gw/swimas/extra/kepler/2.5p2-2.1.3;
IMAS environment loaded.
Please do not forget to set database by calling 'imasdb <machine_name>' !
In that case, call kepler_install_light - you will see installation process running in your terminal.
> kepler_install_light
Warning: $KEPLER_INSTALL_PATH override by environment: /afs/eufus.eu/user/g/g2michal/imas-kepler/2.5p2-2.1.3
mkdir: created directory ?/afs/eufus.eu/g2itmdev/user/g2michal/imas-kepler/2.5p2-2.1.3?
sending incremental file list
.ptolemy-compiled
build-area/
build-area/README.txt
build-area/build.xml
build-area/current-suite.txt
...
...
...
?gui? -> ?gui-2.5?
?common? -> ?common-2.5?
Done installing /afs/eufus.eu/g2itmdev/user/g2michal/imas-kepler/2.5p2-2.1.3.
Run `module switch kepler/2.5p2-2.1.3` to update $KEPLER to match.
Then run `kepler` to try your lightweight installation.
You have to switch module, to make sure that KEPLER variable points to proper location.
> module switch kepler/2.5p2-2.1.3
Once you have set version of Kepler, you can run it by typing kepler
> kepler
The base dir is /afs/eufus.eu/g2itmdev/user/g2michal/imas-kepler/2.5p2-2.1.3
Kepler.run going to run.setMain(org.kepler.Kepler)
JVM Memory: min = 1G,  max = 8G, stack = 20m, maxPermGen = default
adding $CLASSPATH to RunClassPath: /gw/switm/jaxfront/R1.0/XMLParamForm.jar:/gw/switm/jaxfront/R1.0/jaxfront-core.jar:/gw/switm/jaxfront/R1.0/jaxfront-swing.jar:/gw/switm/jaxfront/R1.0/xercesImpl.jar:/gw/swimas/core/imas/3.20.0/ual/3.8.3/jar/imas.jar
...
...
Installation of “dressed” version of Kepler (with actors)
In order to use most recent version of Kepler (with actors) do following. First of all make sure you have directory imas-kepler inside your $HOME
> mkdir $HOME/imas-kepler
Then, you can load imasenv module by calling
> module load imasenv
If there is no Kepler version installed, you will be informed by message
WARNING: Cannot find /afs/eufus.eu/user/..../imas-kepler/2.5p2-2.1.3... Run kepler_install_light before running kepler;
INFO: setting KEPLER=/gw/swimas/extra/kepler/2.5p2-2.1.3;
IMAS environment loaded.
Please do not forget to set database by calling 'imasdb <machine_name>' !
You have to switch to “dressed” version of Kepler by calling
> module switch kepler/2.5p2-2.1.3_IMAS_3.20.0
> kepler_install_light
Warning: $KEPLER_INSTALL_PATH override by environment: /afs/eufus.eu/user/g/g2michal/imas-kepler/2.5p2-2.1.3_IMAS_3.20.0
mkdir: created directory ?/afs/eufus.eu/g2itmdev/user/g2michal/imas-kepler?
mkdir: created directory ?/afs/eufus.eu/g2itmdev/user/g2michal/imas-kepler/2.5p2-2.1.3_IMAS_3.20.0?
...
...
Done installing /afs/eufus.eu/g2itmdev/user/g2michal/imas-kepler/2.5p2-2.1.3_IMAS_3.20.0.
Run `module switch kepler/2.5p2-2.1.3_IMAS_3.20.0` to update $KEPLER to match.
Then run `kepler` to try your lightweight installation.
You have to switch module, to make sure that KEPLER variable points to proper location.
> module switch kepler/2.5p2-2.1.3_IMAS_3.20.0
Once you have set version of Kepler, you can run it by typing kepler
> kepler
The base dir is /afs/eufus.eu/g2itmdev/user/g2michal/imas-kepler/2.5p2-2.1.3_IMAS_3.20.0
Kepler.run going to run.setMain(org.kepler.Kepler)
JVM Memory: min = 1G,  max = 8G, stack = 20m, maxPermGen = default
...
...
IMAS Kepler 2.1.5 (release candidate)
Most recent steps for Gateway users
In order to use most recent version of Kepler do following. First of all make sure you have directory imas-kepler inside your $HOME
> mkdir -p $HOME/imas-kepler/modulefiles
Make sure to set IMAS_KEPLER_DIR variable inside .cshrc file
> echo "setenv IMAS_KEPLER_DIR $HOME/imas-kepler" >> ~/.cshrc
Now, you can load imasenv/3.21.0 module by calling
> module load imasenv/3.21.0
Note that this module uses kepler/2.5p2-2.1.5 instead of kepler/2.5p2-2.1.3
> module load imasenv/3.21.0
IMAS environment loaded.
Please do not forget to set database by calling 'imasdb <machine_name>' !
Now, you can install your personal Kepler installation (please note that since release 2.5p-2.1.5 and keplertools-1.7.0 it is possible to switch between different installations of Kepler (they will not collide).
> kepler_install my_own_kepler
Using IMAS_KEPLER_DIR at: /pfs/work/g2michal/imas-keplers.
Using KEPLER_SRC from KEPLER: /gw/swimas/extra/kepler/2.5p2-2.1.5.
mkdir: created directory ?/pfs/work/g2michal/imas-keplers/my_own_kepler
mkdir: created directory ?/pfs/work/g2michal/imas-keplers/my_own_kepler/.kepler?
mkdir: created directory ?/pfs/work/g2michal/imas-keplers/my_own_kepler/.ptolemyII?
mkdir: created directory ?/pfs/work/g2michal/imas-keplers/my_own_kepler/KeplerData?
Done installing /pfs/work/g2michal/imas-keplers/my_own_kepler/kepler.
?/gw/swimas/extra/keplertools/1.7.0/share/modulefiles/kepler? -> ?/pfs/work/g2michal/imas-keplers/modulefiles/kepler/my_own_kepler?

Kepler was installed inside /pfs/work/g2michal/imas-keplers/my_own_kepler
Its module file is: /pfs/work/g2michal/imas-keplers/modulefiles/kepler/my_own_kepler
To load this environment, run: module switch kepler/my_own_kepler
To see available installations: module avail kepler
As you can see, your personal Kepler installations are available via modules. In order to switch to given version of Kepler you need to switch the module
> module switch kepler/my_own_kepler
Once you have set version of Kepler, you can run it by typing kepler
> kepler
kepler
The base dir is /marconi_work/eufus_gw/work/g2michal/imas-keplers/my_own_kepler/kepler
Kepler.run going to run.setMain(org.kepler.Kepler)
JVM Memory: min = 1G,  max = 8G, stack = 20m, maxPermGen = default
...
...
Installation based on README file
Installation instructions based on most recent version of IMAS Kepler
Detailed, up to date, instructions on how to install and switch between different installations of Kepler, can be found here
> git clone ssh://git@git.iter.org/imex/kepler-installer.git

> cat kepler-installer/README
You can also find latest documentation at following location (Gateway)
> cat $SWIMASDIR/extra/kepler-installer/README